<Netflix 的軟體設計哲學:Hexagonal Archtecture>

Index
導言
這篇是整理翻譯 <Ready for changes with Hexagonal Architecture>,其中 Netflix 工程師把它們從 Monolith 轉換到 Microservices 然後介紹 Hexagonal Architecture 種種細節。
建議各位讀者把這篇當成故事,更能了解 Microservices 和 Hexagonal Architecture 誕生的因果。
前言
隨著每年的 Netflix 成長,我們實作 Application 的時候必須維持很高的效率。我們的 Engineering 組織從編劇、播放、排程、供應商管理、獲取劇本內容…etc,管理超多的 Applications 。
Chapter 1:高度的整合
大約一年前吧 (這裡指的是 2019年),我們要開發一個超大型的專案,需要整合多個 Domain,而且還要管理超多的不同系統的 Database。
具個例子來說好了,像是:
- movies
- production dates
- employees
- shooting locations
- etc…
全部分散在不同的 services,protocols 也很多種,例如:
- gRPC
- JSON API
- GraphQL
- etc…
Chapter 2:Monolith to Microservices
當 Netflix 還是小公司的時候,我們為了 Application 的能見度,我們選擇 Monolith 架構。Monolith 可以超級快速的開發新功能。在某個時間點過後,我們有超過 30 個員工管理超過 300 個 database table!
隨著時間的推移,Application 開始慢慢變得高度專業化。我們決定開始開始拆解 Monolith,這個決定不是因為性能問題,而是有些 Domain 太專業又複雜了,不得已分離出來獨自有自己的開發流程。
隨著開始打造新的 Application,我們需要用到許多舊系統的資料,而麻煩的點在於這些資料分散在不同的 database 上。我們開始意識到把 monolith 拆分已經不可避免的會發生了,所以我們開始逐漸的從 Monolith 讀取出來放到新的 database,一旦 microservices 上線,我們就會切換到這些 data sources。
Chapter 3:Hexagonal Architecture
我們決定用 Hexagonal Architecture 來解決上面的難題。
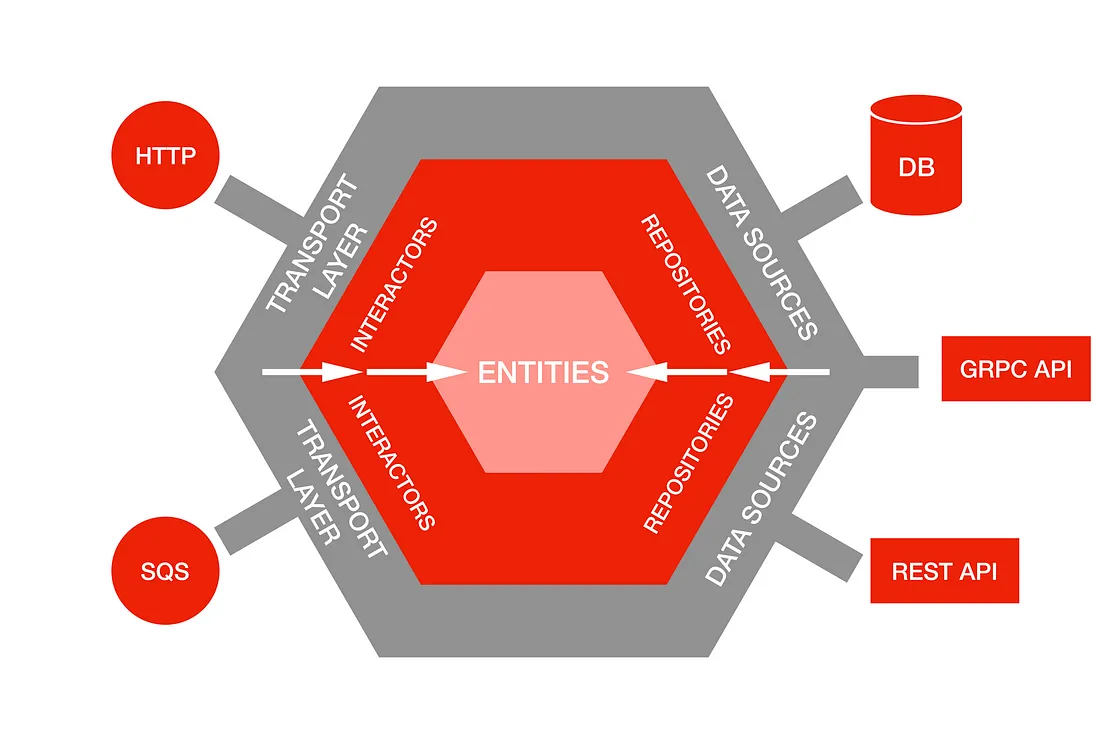
Hexagonal Architecture 的想法是將 input 和 output 放在設計的邊緣,可以不影響商業邏輯的情況下更換 data sources。
Hexagonal Architecture 的哲學是商業邏輯不應該依賴於任何 REST、GraphQL API,還有也不能依賴於 data 從哪裡來,甚至是從一個 CSV 檔讀取,都不能影響到商業邏輯。
其中一個最大的好處就是我們能夠獨立測試我們自己的商業邏輯有沒有問題。
註記:以下我會用我的理解寫一些 Go code,而這些並不是原始文章的內容,請讀者注意!
Core concepts
為了清楚的介紹 Hexagonal Architecture,我們要定義一下商業邏輯的三個名詞,分別是 Entities, Repositories, Interactors。
Entities
Entities 代表 domain objects,例如:Movie、Shooting Location,它們自己完全不知道自己會被儲存在哪裡。
type Movie struct {
    ID           int    // 電影 ID
    Title        string // 電影名稱
    ReleaseYear  int    // 上映年份
    Description  string // 電影簡介
}

type ShootingLocation struct {
    ID        int    // 拍攝地點 ID
    Name      string // 拍攝地點名稱
    Address   string // 拍攝地點地址
    City      string // 拍攝地點所在城市
    State     string // 拍攝地點所在州/省
    Country   string // 拍攝地點所在國家
}
Repositories
Repositories 是一種 Interface,確保 Entities 的建立和改變。Repositories 會提供一堆 methods 可以跟 data sources 溝通,比如說:回傳一個 User 或是一堆 Users。
type User struct {
    ID        string
    Name      string
    Email     string
    CreatedAt time.Time
    UpdatedAt time.Time
}

type UserRepository interface {
    // 取得使用者 by ID
    GetUserByID(id string) (*User, error)

    // 取得所有使用者
    GetAllUsers() ([]*User, error)

    // 新增使用者
    CreateUser(user *User) error

    // 更新使用者
    UpdateUser(user *User) error

    // 刪除使用者 by ID
    DeleteUserByID(id string) error
}
Interactors
Interactors 是用來實作與執行特定領域的動作或業務邏輯。這些類別通常被稱為 Service Objects 或 Use Case Objects,它們可以與 Repositories 和 Entities 一起使用,用於解決特定的問題或執行某些任務。
Interactors 的主要職責是協調和執行領域相關的任務,例如:在電影製作上建立新的項目,管理項目內的資料,並檢查並驗證項目中的資料,它們也可以實現複雜的業務邏輯。
更細節來說像是在建立新的項目時,檢查一個項目是否符合特定的要求,並確保其遵循一些標準。
type Production struct {
    ID             int
    Title          string       // 片名
    ReleaseYear    int          // 發行年份
    Description    string       // 簡介
    ProductionDate time.Time    // 拍攝日期
    ShootingLocation *ShootingLocation  // 拍攝地點
    Employees      []Employee   // 參與人員
}

type Employee struct {
    ID        int
    FirstName string          // 名字
    LastName  string          // 姓氏
}

type ShootingLocation struct {
    ID      int
    Name    string           // 名稱
    Address string           // 地址
}

type ProductionRepository interface {
    Save(*Production) error   // 儲存一部電影
}

type ShootingLocationRepository interface {
    FindByID(int) (*ShootingLocation, error)   // 依據 ID 取得拍攝地點
}

type ProductionOnboardingInteractor struct {
    productionRepository      ProductionRepository           // 電影 Repository
    shootingLocationRepository ShootingLocationRepository     // 拍攝地點 Repository
}

func NewProductionOnboardingInteractor(pr ProductionRepository, slr ShootingLocationRepository) *ProductionOnboardingInteractor {
    return &ProductionOnboardingInteractor{
        productionRepository: pr,
        shootingLocationRepository: slr,
    }
}

func (i *ProductionOnboardingInteractor) OnboardProduction(title string, releaseYear int, description string, productionDate time.Time, shootingLocationID int, employees []Employee) (*Production, error) {
    shootingLocation, err := i.shootingLocationRepository.FindByID(shootingLocationID)
    if err != nil {
        return nil, err
    }

    empIDs := make([]int, len(employees))
    for i, e := range employees {
        empIDs[i] = e.ID
    }

    production := &Production{
        Title: title,
        ReleaseYear: releaseYear,
        Description: description,
        ProductionDate: productionDate,
        ShootingLocation: shootingLocation,
        Employees: employees,
    }

    err = i.productionRepository.Save(production)
    if err != nil {
        return nil, err
    }

    return production, nil
}
有了前三個主要觀念,我們可以不用理會 Data Sources 和 Transport Layer 等細節,就可以驗證商業邏輯的正確性。
Data Sources
Data Source 實作了存取 Repository 所定義的方法,並且存儲和傳遞資料的實現方式。
在 Hexagonal Architecture 中,Data Sources 位於應用程式核心邊緣,是與外部系統交互的接口。使用 Data Sources 的好處是,當需要更改儲存實作時,核心業務邏輯不會受到影響。
Data Sources 可以是以下例子:
- SQL database adapter
- elastic search adapter
- REST API
- CSV file
Transport Layer
Transport Layer 是用來觸發 Interactors 進行業務邏輯處理的輸入介面。最常見 microservices 的 Transport Layer 是HTTP API Layer 和處理請求的 controller。通過將業務邏輯抽象到 Interactor 中。
我們不會被限定於特定的 Transport Layer 或 controller。Interactor可以被各種方式觸發,不僅可以由 controller 觸發,還可以由 events、cron job、command line 觸發。
The dependency graph
以下就是容易理解的 dependency graph。

傳統的架構都是一路向下依賴,例如:
- Transport layer 依賴 Interactor Layer
- Interactor Layer 依賴 Persistence layer
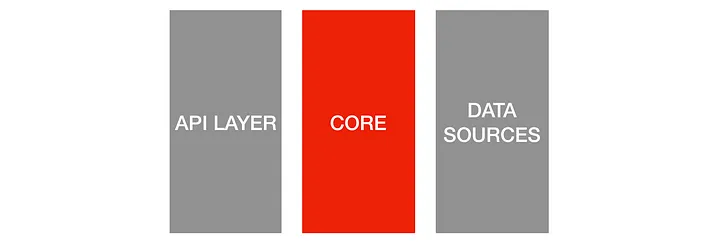
但在 Hexagonal Architecture,所有依賴都指向中心,分離了商業邏輯和外部的 Layer。但是我們還是保有以下優點,例如:
- Transport layer 知道如何使用 interactors
- Repository interface 也能使用 data sources
基於這些設計,轉換 data sources 就變成很容易的任務。
Chapter 4:Swapping data sources!
Production 實際情況
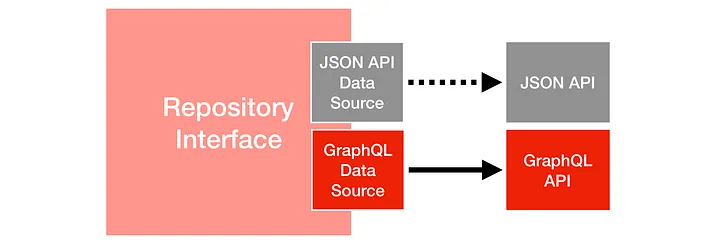
雖然說比預期的還要早切換 data sources,我們最終用上面的架構在 2小時內完成了從 JSON API 到 GraphQL,而且只修改了一行 code 就行!
在過程中突然遇到讀取限制的問題,為了解決這個問題,需要將某個 Entity 的讀取轉換成一個新的微服務。這個微服務透過 GraphQL 聚合層提供服務。這個微服務與單體應用程式保持同步,並且擁有相同的數據,從其中一個服務讀取或從另一個服務讀取產生相同的結果。

隱藏 data source 的細節
其中一個好處就是就是能夠封裝 data source 實作的細節。
我們有一個 case 是我們需要呼叫下游的 API,不過下游的團隊沒有實作 bulk fetch,只有 single fetch,明顯需要一些時間實作。
那怎麼麼辦呢?
團隊溝通後決定用一個方法,我們在 repository 中加入一個 method,會 concurrent call 下游的 single fetch,然後加上 record id,雖然只是暫時的解決方案,但是我們只需要修改一點點的 code,就可以達到我們要的效果。

這個架構可以幫我們更快的交付產品,而且更容易地維護和擴展系統,同時降低了風險和成本。
Chapter 5:Testing strategy
當然啦~選擇 Hexagonal Architecture 我們就想好了測試的策略,以下就介紹一下。
Interactors test
Interactors test,測試最核心的功能,這裡是我們的商業邏輯,我們會搭配 mock type repository。由於是核心商業邏輯,我們會測到非常非常細節。

Data sources test
接著就是測試 repository interface 有沒有接到 data sources,確保東西真的有寫進去。

E2E test
最後就是全面的測試,在 Hexagonal Architecture 中,我們有一組集成測試 (Integration specs)。這些測試會從我們的 Transport / API layer 開始,通過 interactors、repositories、data sources,直到最後打到下游服務 (downstream services)。
如果一個 data source 是外部的 API,我們會打這個 API 並且記錄下回傳的 response(並將它們儲存在 git 中),這樣我們的測試套件在之後的每一次執行上都可以快速運作。對於這層,我們不會進行全面的測試涵蓋,通常每個 domain action 只有一個成功情境和一個失敗情境。

心得與總結
這篇文章應該算是 SaaS 和開發微服務的必讀文章,概念其實和 Clean Architecture 蠻像的,不過 Netflix 更鉅細靡遺告訴我們細節,算是作為 Back-end SWE 的入門磚吧,感謝作者的分享!